Video: Customize the billing templates
After you download the standard billing template, open it in Microsoft Word. To prepare it for editing, you need to ensure you can view the header and footer areas, and the hidden items and table gridlines. You can then proceed to customize the template.
It has three sections. The header contains your company details, client code and invoice details. the body of the template contains the job details and invoice amount. The footer contains your payment (remittance) advice details.
To open a header or footer for editing, double click at the top or bottom of the page clearly marked with a blue line.

If you are still unable to see the footer and header areas, you must enable white spaces between pages.
- Click File > Options > Display.
- Select Show white space between pages in Print Layout view under Page display options.

In addition to many merge fields, each template contains bookmarks and paragraph marks that are placed within tables. These items are also called non-printing characters, as they will not show in the printed invoice. Therefore, they may be hidden when you open the template. You should ensure that all of these items are visible and that you understand the function of each one. This will help you with editing and formatting the template, and prevent the deletion of important information.

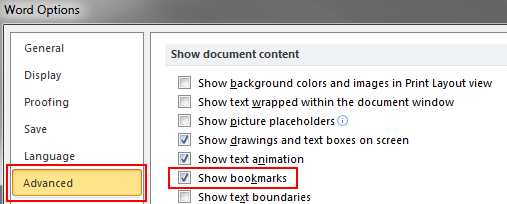
Bookmarks [ ] identify an area where data from your CCH iFirm system will be automatically inserted. If no such data exists, for example, if your client does not have a website, nothing will be inserted into that location and the next bookmark will move into its place. Bookmarks are very important and should NEVER be edited or deleted. They determine whether a row is displayed in the printed letter or not, preventing blank rows in a table. If you cannot see any bookmarks when you open the template:
- Click File > Options > Advanced.
- Scroll down to Show document content.
- Select the Show bookmarks check box.

Paragraph marks  identify and adjust the spacing between paragraphs in the template. If you cannot see them, click the Show/Hide paragraph marks button on the Home tab.

Although the content of each template is organized into tables, you will not see the gridlines of the tables when you first open the template. Viewing the gridlines is important to accurately adjust the alignment of the columns and rows of the various tables included in the templates.
- Click Table Tools > Layout > Table.
- Click View Gridlines.
